The First Lunar Landing

The First Lunar Landing

PART I


ARMSTRONG
It was our pleasure to participate in one great adventure. It's an adventure that took place, not just in the month of July, but rather one that took place in the last decade. We had the opportunity to share that adventure over its developing and unfolding in the past months and years. It's our privilege today to share with you some of the details of that final month of July that was certainly the highlight, for the three of us, of that decade. We're going to talk about the things that interested us most and particularly the things that occurred on and about the Moon. We will use a number of pictures, with the intent of pointing out some of the things that we observed on the spot, which may not be obvious to those of you who are looking at them from the surface of Earth. The flight as you know started promptly, and I think that was characteristic of all the events of the flight. The Saturn gave us one magnificent ride, both into Earth orbit and on a trajectory to the Moon. (Photo 1.) Our memory of that actually differs little from the reports that you have heard from the previous Saturn V flights and the previous flights served us well in preparation for this flight in the boost as well as the subsequent phases. We would like to skip directly to the translunar coast phase and remind ourselves of the chain of events -- that long chain of events -- that actually permitted the landing, starting with the undocking, the transposition and docking sequence.

COLLINS
This was our first look at the magnificent machinery which had been behind us until this point. The booster -- of course the first and second stages had long since separated, but this shows the LM -- that's the LM inside of the third stage (the S-4B) after the translunar injection burn. (Photo 2.) This maneuver was an interesting combination of manual and automated techniques in that we programmed the onboard computer to make the turnaround. Then the final maneuvers were made completely manually. As I approached the LM I had an easy time because I had a docking target (Photo 3) which allowed me to align the probe and the drogue. During this time, I also checked out the proper vehicle response to my strict inputs.


ALDRIN
We made two entries into the lunar module. This is the first view of the inside of this. (Photo 4.) The final activation was made on the day of power descent and on the two previous days when we entered, we removed the probe and drogue, and found that we had a rather long tunnel between the two vehicles. In entering the lunar module one has to do a slight flip maneuver or a half gainer to get into position, for the lunar module is in a sense upside down relative to the command module.

COLLINS
This is in lunar orbit after separation of the lunar module from the command module as viewed through my window. (Photo 5.) This was a busy time for me in that I was taking motion pictures through the right hand window at the same time I was taking still photos through the left hand window and also flying my vehicle -- and probably poorly -- and taking a close look at the LM as he turned it around. My most important job here was to make sure that all his landing gear was down and properly locked prior to his descent and touchdown. Next came his yaw maneuver and the white dots that you see are the landing gear pads. This shows the LM -- either right side up or upside down I'm not sure which. It looks more to me like a praying mantis than it does a first class flying machine in this view, but it was a beautiful piece of machinery. The landing gear is at the top and you can see the probes which indicate lunar contact as thin wires extending upward from the landin gear.


ALDRIN
Of course before we could undock we had to complete the activation. Now the day before we undocked we entered the LM and went through an entire switch configuration check and we exercised the various communication modes. In retrospect, since we did have a little bit of a communication problem during power descent, we would recommend that we might make a more thorough check of this on the day before descent. On the day that we did finally enter the LM for the landing maneuver we went through a staggered sequence of suiting and we found that with all the simulations that we had run, back in Houston -- or with Houston tied with our simulations at the Cape that we were quite confident that we would be able to complete this LM activation in the given time period (which was approximately 4 hours). We managed to get 30 minutes ahead of the time and it allowed us to get a more accurate platform alignment check at one point. After the undocking maneuver we went through a brief radar check and then the command module executed a 2 foot-per-second maneuver away from us so that we would both be able to independently exercise our guidance systems through a star alignment check which we did following this separation maneuver. (Photo 6.) Soon after we were in the vicinity close to the landing site and then the command module was traveling right over the center of our targeted point. It approached what we call the Cat's Paw. Following this separation maneuver on the back side of the Moon we made a descent orbit insertion which was slightly over 70 feet per second that lowers our altitude down to 50 thousand feet. We had two guidance systems working for us. They behaved perfectly. Both of them agreed extremely closely as to the results of this maneuver. Following this we used the radar to confirm the actual departure rate from the command module.


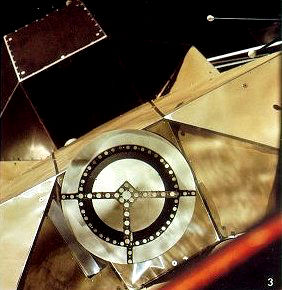
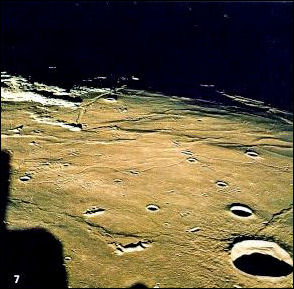
ARMSTRONG
This is a view of the descent trajectory area as viewed through the LM window during our activation. (Photo 7.) In the bottom right of the photograph is the crater Maskelyne and the bottom center is the mountain called Boot Hill. Immediately above Boot Hill is a small sharp-rimmed crater called Maskelyne W which was the crater we used to determine our downrange and crossrange position prior to completing the final phases of the descent. The landing area itself is in the smooth area at the top of the picture just before we arrive at the shadow or what is called the terminator. We had seen a number of pictures from Apollo's 8 and 10 which gave us an excellent understanding of the ground track over which we would pass during the descent. The crater Maskelyne W appeared approximately two to three seconds late and gave us the clue that we would probably land somewhat long. After completing those position checks we rolled over face up so that the landing radar could lock on the ground and confirm our actual altitude. Now, at this phase in the trajectory we were pointed directly at the planet Earth. In the final phases of descent after a number of program alarms, we looked at the landing area and found a very large crater. (Photo 8.) The camera is located in the right window and looks to the right and it just barely sees the boulder field that we are passing over. We are at 400 feet and the boulders are about 10 feet across. This is the area which we decided we would not go into; we extended the range downrange and saw this crater which we passed over -- this 80-foot crater-- in the final phases of descent and later took some pictures of it. The exhaust dust was kicked up by the engine (Photo 9) and this caused some concern in that it degraded our ability to determine not only our altitude and altitude-grade in the final phases, but also, and probably more importantly, our translational velocities over the ground. It's quite important not to stub your toe during the final phases of touchdown. Once settled on the surface, the dust settled immediately and we had an excellent view of the area surrounding the LM. We saw a crater surface, pock-marked with craters up to 15, 20, 30 feet and many smaller craters down to a diameter of 1 foot and, of course, the surface was very fine-grained, (Photo 10.) We could tell that from our view out the window, but there were a surprising number of rocks of all sizes.